Chrome Kiosk Mode: Cross-Platform Implementation & Issues
What is Chrome Kiosk Mode?
Chrome Kiosk Mode is a feature that locks Google Chrome to display a single website or web app in full-screen, restricting usernavigation and access to other browser functions or the underlyingoperating system. It's commonly used for digital signage or public terminals.
Here are some effective setup methods, you can choose the one suits you the best.
| Methods | Benifits | Scenarios |
|---|---|---|
| 1. Google Admin | Bulk management + Auto-launch + URL blocking | Enterprises / Schools (requires Chrome Enterprise license) |
| 2. Third-party MDM solution | Remote configuration + Multi-device control + Custom browser settings | Businesses with high security requirements |
| 3. Lock down Chrome Browser with Extension | Quick single-device lockdown + Lightweight deployment | Individual use / Temporary devices |
| 4. Add Chrome As Shortcut Tab | Command-line customization + No extra tools needed | Technical users / Temporary single-device needs |
1 Must-Know Highlights for Every Method
Method 1. Google Admin for Chrome Devices
This method is the top pick for businesses and educational institutions managing a fleet of devices running Chrome OS.
Core Steps: You'll log into your Google Admin console, select the Kiosk Mode option, configure URL whitelists (to allow access only to approved websites), and lock the Chrome OS version (to prevent update conflicts with your kiosk app).
Two Key Modes:
Auto-Launch: The device automatically launches a specific application in full-screen upon startup, like a restaurant ordering system. This is perfect for dedicated, single-purpose kiosks.
Public Session: Designed for multiple, temporary users, where no data is saved between sessions, similar to public library computers.
Use your credentials to log in to the Google Admin console, and navigate to the menu: Devices > Chrome > Apps & Extensions > Kiosk.
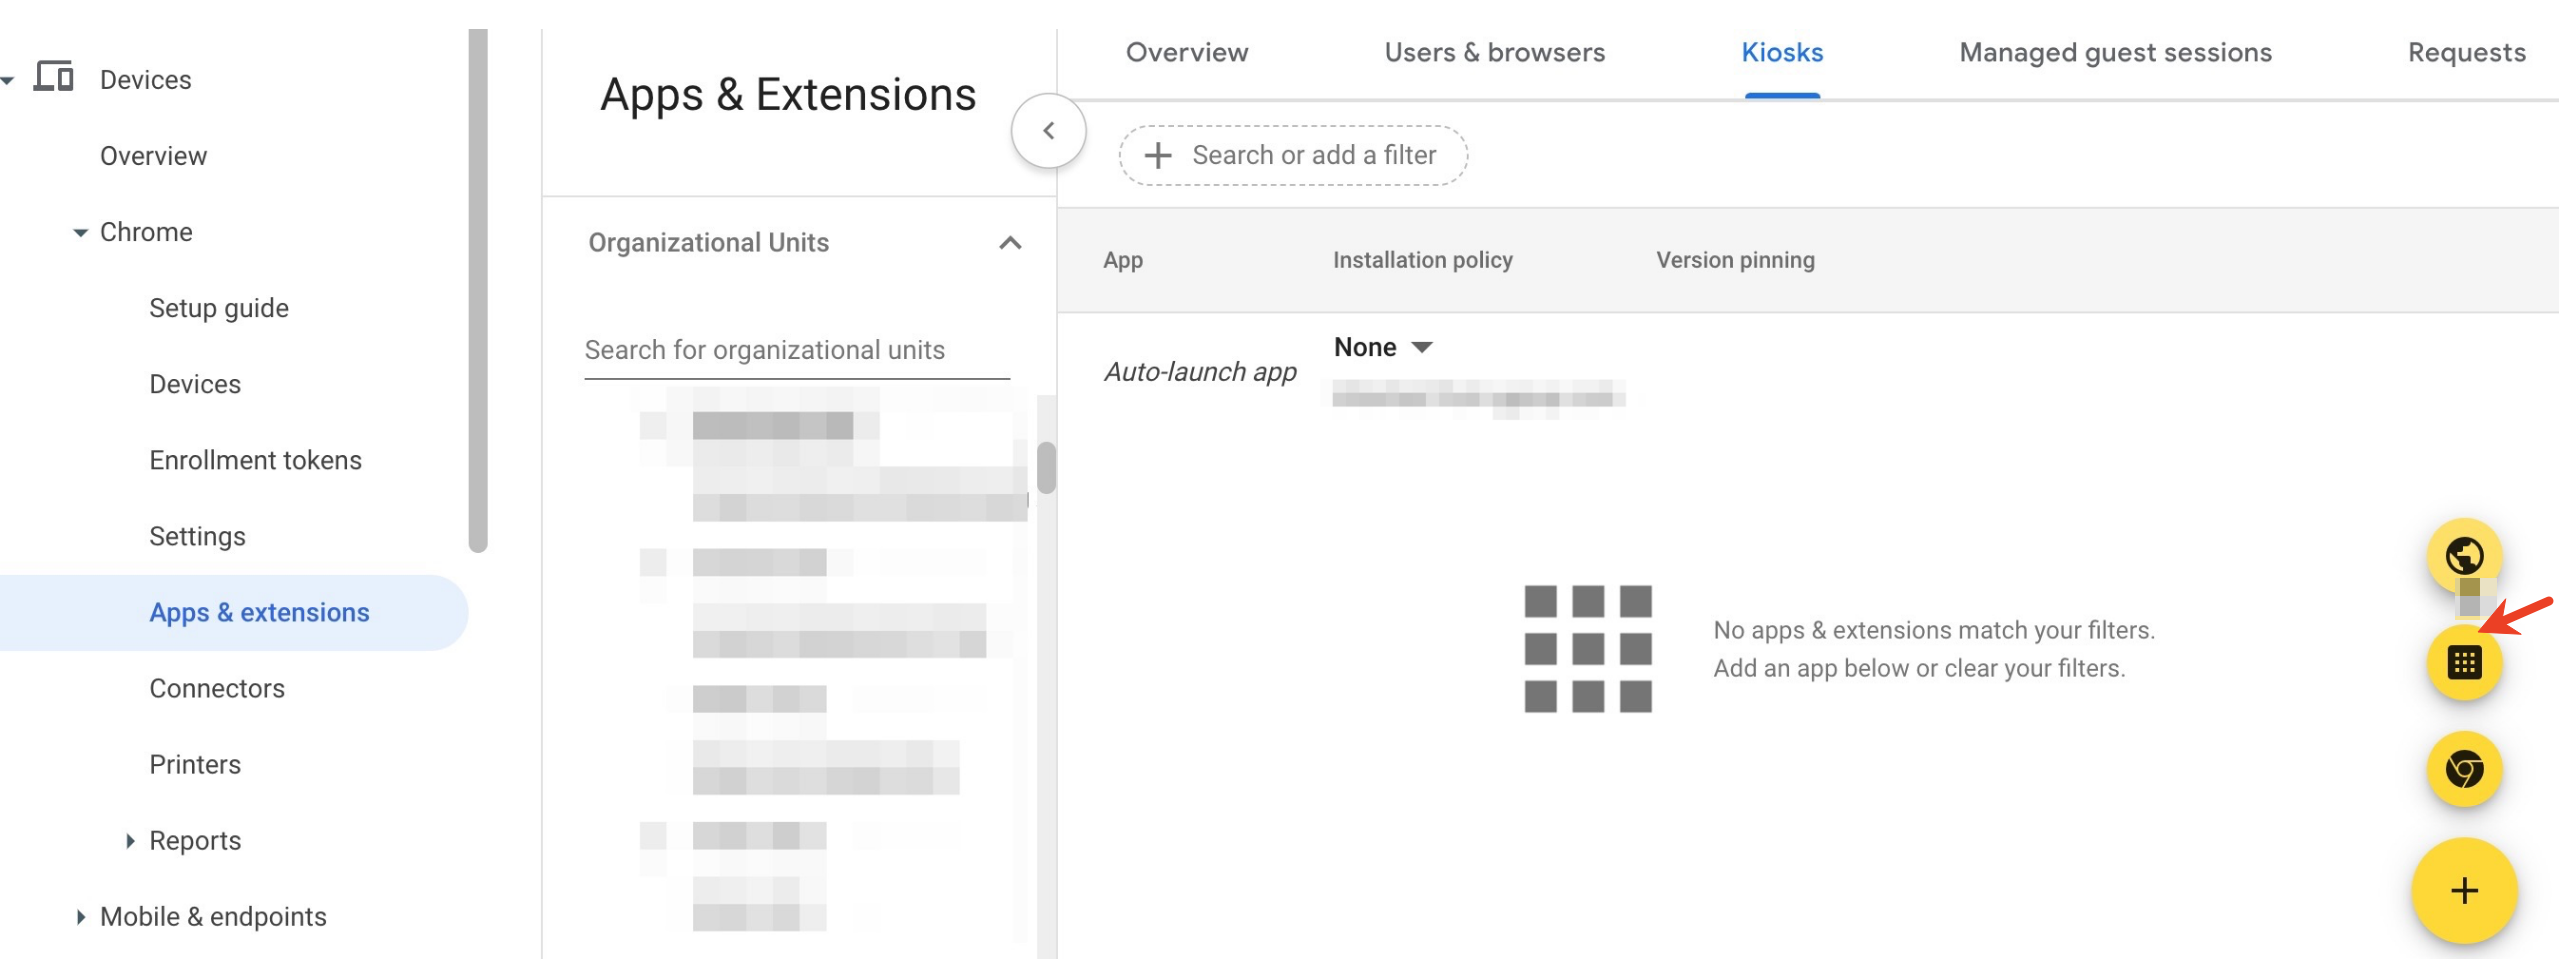

Step 1: Log in to Google Admin console
Select the Chrome app for lockdown, and configure deployment and launch settings. You can choose Public Session Kiosk or Auto-Launch Kiosk App.
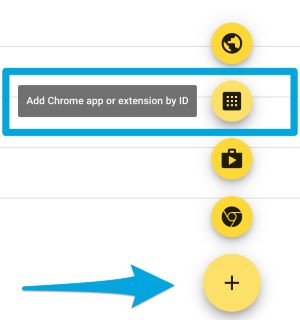

Step 2: Chrome Kiosk Setup
In Chrome > Settings tab, you can set URL blocking, which supports up to 1000 URLs.
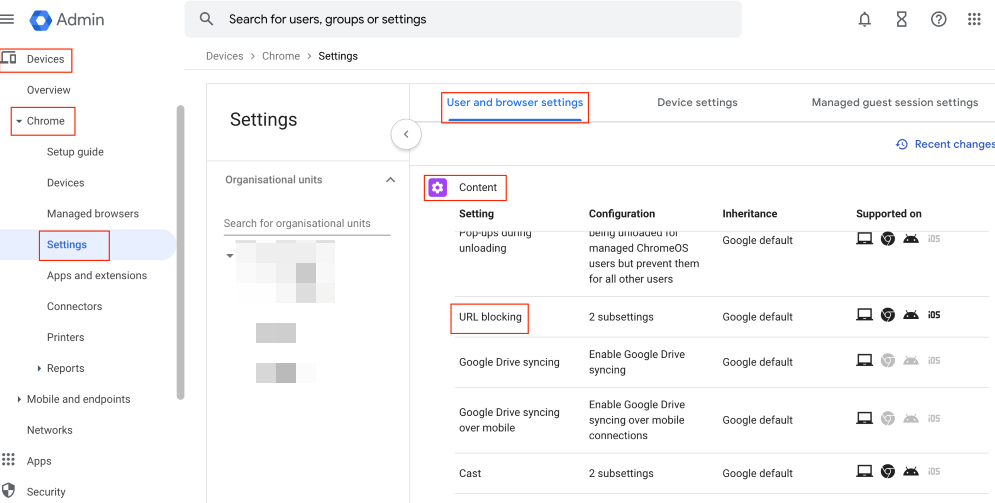

Step 3: URL List
- You can also specify the required_platform_version in the manifest and then block automatic app updates in Google Admin to avoid compatibility issues caused by updates.
Step 4: Chrome Version Conrol
After completing the setup, verify the settings on the managed device: restart the Chrome device and check the lockdown status.
Step 5: Verification
Method 2. Apply a Third-party MDM solution
Using an MDM (Mobile Device Management) solution offers powerful remote management capabilities for Windows devices running Chrome in kiosk mode.
Key Advantage: MDM allows you to batch-push policies to multiple Windows devices. For example, you can easily restrict access to non-whitelisted websites or disable developer tools across your entire fleet.
Critical Actions (using AirDroid Business as an example): You'd enroll your devices with AirDroid Business, create a policy (defining your kiosk rules), bind the devices to that policy, and then enable "Single app kiosk mode" to lock down Chrome.
- Step 1.Sign up and log into AirDroid Business admin console
Click the free trial button below to sign up for an AirDroid Business account and use it to log into the admin console.
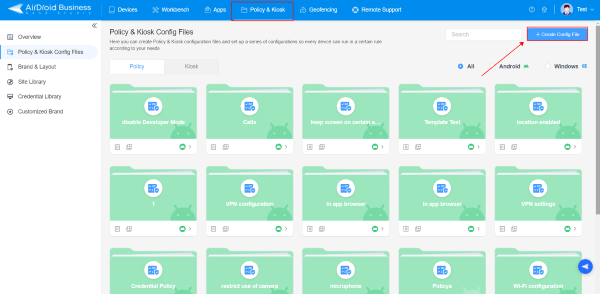
- Step 2.Create a profile for kiosk settings
First, follow the AirDroid Business enrollment guide to bind your Windows devices to the admin console. Then, navigate to 'Policy & Kiosk', create a new Policy Config File for Windows, click 'Browser', select 'Open' on Browser Configuration, and complete the configuration of website allowlists.
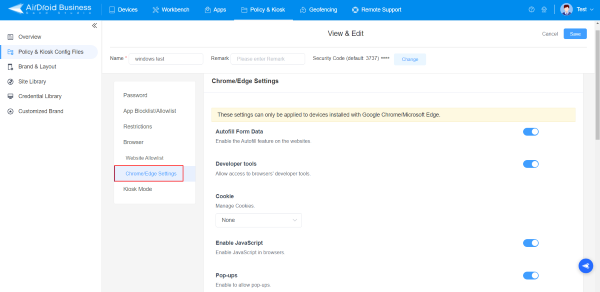
- Step 3.Build a custom Chrome browser
Navigate to Chrome/Edge Settings to view a list of browser functions. Modify the settings according to your business needs.
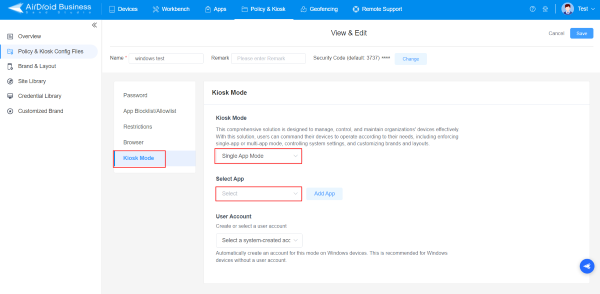
- Step 4.Kiosk Mode
Move to 'Kiosk mode', select 'single-app mode', choose Google Chrome from the app list to ENABLE Chrome kiosk mode, complete the 'user account' setting and click save.
- Step 5.Apply settings to target Windows devices
Apply this Policy Config File to your target Windows devices to finish kiosk mode configurations.
Method 3. Lock down Chrome Browser with Extension
This is a very simple method, ideal for individual use cases where you need to quickly turn a PC into a dedicated browser.
3 Simple Steps: Open chrome://extensions, enable developer mode in Chrome, input an application ID, and restart the device.
Best For: Individuals who want to dedicate their PC to a specific browser function, such as an information lookup machine at an exhibition.
Open Chrome browser and go to chrome://extensions, enable Developer Mode at the top right of this page.


Step 1: Enable Developer Mode
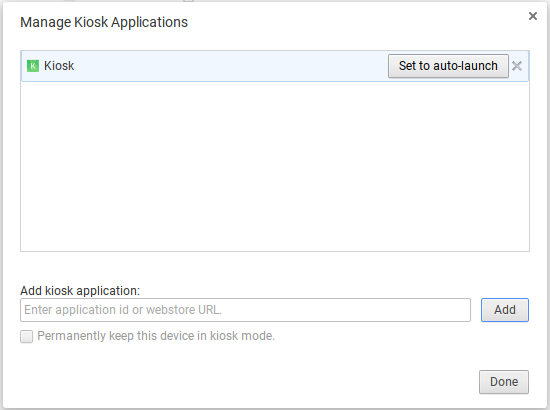
- Click on Manage kiosk applications and enter the Chrome app ID. Click done.
Step 2: Chrome Lockdown
Note : If the "Manage kiosk application" button is not available on your Chrome device, please refer to this solution.
- After restarting or logging into the device, Chrome kiosk mode will automatically launch.
Step 3: Restart the Device
Tips : Developers can leverage ChromeOS Dev documentation and PWA technology to deliver advanced features like offline functionality and hardware API access in Chrome kiosk mode.
No matter which method you use to configure Chrome Kiosk mode, Chrome will run in single-tab mode by default. This means the browser will be locked to a specific webpage or web app, and users will not be able to manually open new tabs or access other pages.
If you require multi-tab functionality, additional configuration is usually needed: you can use MDM policy settings or the --kiosk parameter combined with other settings to control the browser's behavior.
Method 4. Add Chrome As Shortcut Tab
This method uses a simple command-line argument to launch Chrome directly into kiosk mode.
Core Command: Add --kiosk https://yourtargetwebsite.com to the "Target" field of a Chrome shortcut.(Example: C:\Chrome\chrome.exe --kiosk https://www.airdroid.com)
Important Notes: You'll need to press ALT+F4 to exit kiosk mode. This method is suitable for temporary use due to its lower stability, and enterprises should use it with caution.
Open the Google Chrome browser on your Windows 10/11 OS device and look for the profile icon at the top-right corner of the screen.
Step 1: Open Chrome
Select the profile you want to create a shortcut for. Click the pencil icon labeled "Customize Profile." Enter a name for your Chrome profile, choose a theme color, and select an avatar. Toggle the "Create desktop shortcut" switch to blue. A Chrome shortcut for this profile will then appear on your desktop.
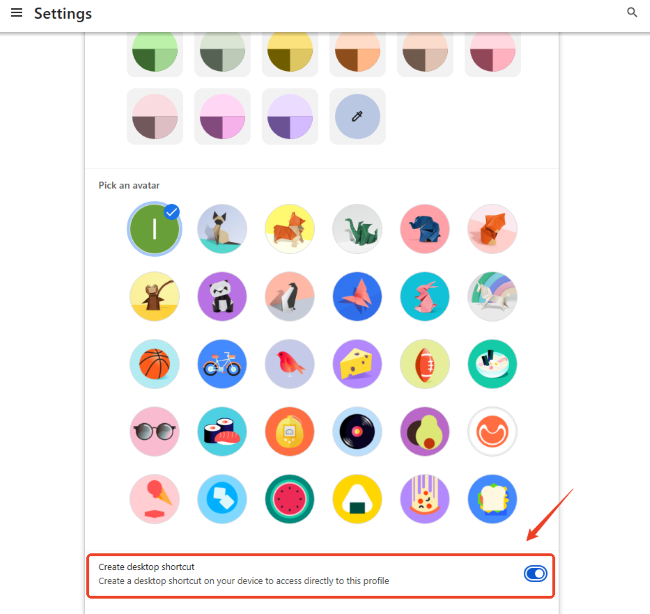

Step 2: Create A Shortcut
- Now close all the Chrome tabs and move to the desktop. You will find your Chrome shortcut there.

Step 3: Move to Desktop
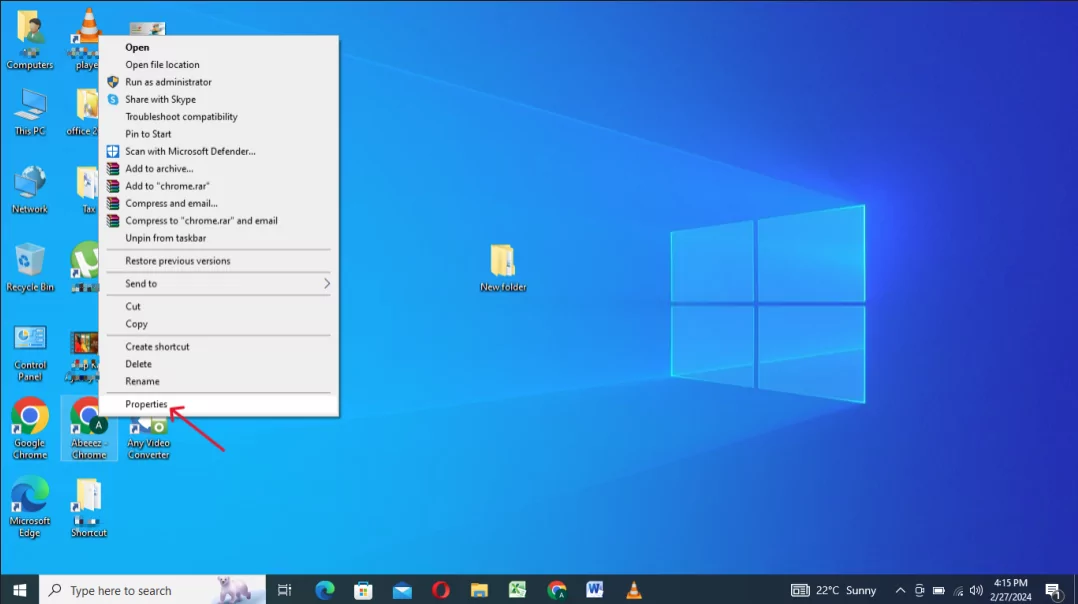
- Right-click on the tab and choose the ‘Properties’ option.
Step 4:Manage Properties
Click on the Shortcut option, and add ‘- -kiosk https://www.airdroid.com/business/’(any other domain in the target box you want to run on the browser). Press ‘OK’ to initiate the settings.
Step 5: Select the ‘Shortcut’ option

After applying the above settings, the Chrome full screen kiosk mode will auto launch with a specific URL mentioned in the properties. If automatic full screen doesn't work on your Windows device, ensure Chrome is set as the default browser and fully closed before starting the setup process.
- Attention: To exit the kiosk mode, you need to press ALT+F4 or Ctrl+Alt+Del.
Step 6: Chrome Full Screen Mode
Tips: Use a combination of shortcut keys and commands to set the Chrome Kiosk mode, it's fast, but requires technical expertise for advanced configurations, such as blocking unnecessary browser functions, and lacks the ability to manage multiple devices from a single workstation. For broader device control, the MDM solution is more effective.
2 Troubleshooting Guide: Common Issues with Shortcut Setup
Issue 1. Kiosk Mode Fails to Launch After Setup
When setting up Chrome Kiosk Mode in Windows, one of the most common issues you can encounter is that Chrome fails to launch after setup. This can happen for (usually) a couple of reasons:
- Incorrect Parameters: The kiosk mode doesn’t start if there is an error in the syntax of the command used to launch Chrome. Check your commands and make sure that there aren’t any misplaced spaces, quotation marks, and typos.
- User Permissions: Make sure that you have the necessary administrative privileges when setting up Chrome Kiosk Mode, or the kiosk mode will fail to launch.
- Conflicts with other Applications: Other applications might interfere with the kiosk mode. Before launching it, make sure to shut down any other application. In particular, make sure you shut down every service running in the background.
Issue 2. Unable to Limit Chrome Browser to a Single Tab
Chrome Browser Kiosk Mode is intended to open a single tab. A common issue that can occur is that, once launched the kiosk mode, Chrome allows multiple tabs, defeating the purpose of the kiosk mode. This can happen for several reasons and this is how you can troubleshoot it:
- Make sure you shut down the Chrome Browser completely before launching the kiosk mode.
- When creating the shortcut, in the Target field, add a starting page by typing: --kiosk http://www.xxx.com
Issue 3. Full Screen Shortcuts Doesn't Work
Sometimes, the Chrome Kiosk Mode can face issues with the full-screen shortcuts (like F11 or Ctrl+Shift+F) that don’t work.
This mainly happens because, when launched, correctly, Chrome is displayed full screen without the need to use shortcuts.
In particular, the command --kiosk launches Chrome, in kiosk mode, full screen. So, make sure you’ve used the right command, and there are no syntax errors, and Chrome will automatically launch full-screen, without any need for shortcuts.
Issue 4. Unable to Run HTML File in Chrome Kiosk Mode
Chrome Kiosk Mode is designed to display web-based content. So, by default, it may not allow to run HTML files for security restrictions. Therefore, to run HTML files, you need to provide the necessary permissions.
- Use this additional command --allow-file-access-from-files to enable Chrome to open local HTML files. The full command should look like this: --kiosk --allow-file-access-from-files
Issue 5. Task Manager Still Accessible in Chrome Kiosk Mode
When in Kiosk Mode, users might still be able to access the Task Manager. This should be fixed because, being able to access the Task Manager, users can exit the Chrome Kiosk Mode or interfere with it.
If you’re experiencing this issue, you can use Registry Editor to disable the task manager. This is how you do it:
- Open the Registry Editor by pressing Win+R and typing regedit
- Navigate to the following:
HKEY_CURRENT_USER\Software\Microsoft\Windows\CurrentVersion\Policies\System
- In the System key, right-click in the right pane and select Nex, then DWORD (32-bit) Value
- Name the value DisableTaskMgr
- Double-click on DisableTaskMgr
- Set the value to 1
Issue 6. Difficult to Exit Kiosk Mode
Because the entire Windows system is locked into the Chrome Browser application, it can be tricky for admins to exit the kiosk mode.
When both shortcuts and task manager are disabled, the most effective way of exiting the Chrome kiosk mode on Windows is to restart the system and reset the session.
But make sure to avoid setting up the system to automatically boot the kiosk mode when restarting.
Issue 7. Chrome Settings or Session Data May Not Persist After Restart
When you want Chrome to persist after restart, you need to set the kiosk mode to be automatically launched upon restart.
To do so, after creating the Chrome Kiosk shortcut, you just need to place the shortcut folder in the Windows Startup folder. This will cause Chrome to start automatically whenever the system is restarted.
If you also want Chrome to restore the last data session upon restart, you need to add the command –restore-last-session when creating your shortcut. So, instead of only using –kiosk, you need to type --kiosk --restore-last-session
Issue 8. Chrome Extension Isn't Working
When Chrome extensions don’t work when the system in kiosk mode, you need to manually enable them by modifying the Kiosk Mode shortcut you’ve previously created. In particular, after locating the shortcut folder:
- Right-click on it and select Properties
- In the Target field, add the following command: --load-extension=”C:\path-to-extension-folder”
3 Summary: 3 Key Questions for Choosing a Method
Q1. How many devices do you have?
Single device: Choose Method 3 (Browser Lockdown) or Method 4 (Shortcut).
Multiple devices: Opt for Method 1 (Google Admin) or Method 2 (MDM Solution).
Q2. Do you need remote management?
Yes: Use an MDM (Method 2).
No: The Shortcut method (Method 4) might suffice.
Q3. Are your security requirements high?
High: Go with Google Admin (Method 1) or an MDM (Method 2).
Low: Browser Lockdown (Method 3) could be sufficient.


Leave a Reply.