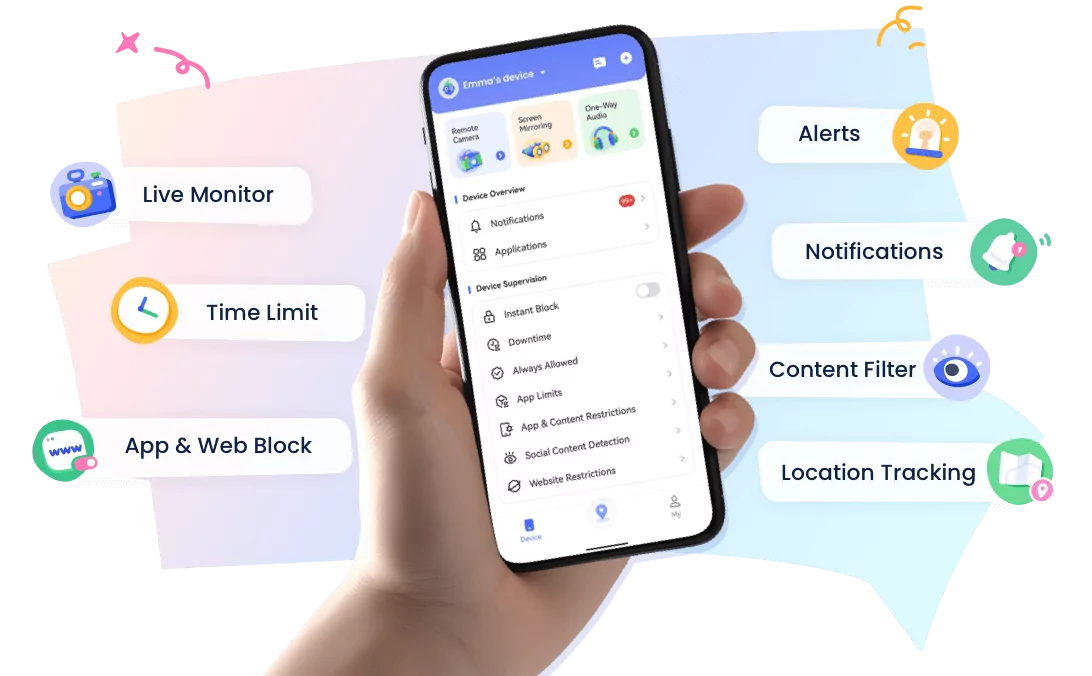
AirDroid Parental Control
24/7 Kids' Guardian via App & Web
- 👀Live surroundings and location tracking
- 🔞Content Monitoring and App/Web Blocking
- ⚠Instant alerts for online risks and geofences
- ⌛Screen time control and monitor
How to Record a Discord Call or Audio in 2025
Discord won't help you save the moments that worth saving by default. Instead, you need a few tools to capture what matters. So if you're having questions like "how do I record a Discord call" or "How do I record Discord audio only," this guide will help you with that.
We'll show you up-to-date methods that work in 2025, with step-by-step instructions for PC, Mac, and mobile users. Some solutions take seconds. Others demand a little technical knowledge.
⚠️ Note: Always get permission from others before recording calls. Recording without consent may violate Discord's Terms of Service or local privacy laws. Ask before you hit "record."
Part 1: Record a Discord Call (Voice + Optional Video)
We all wish there were a "Save conversation" button in Discord, but sadly, there isn't one. So these three methods are the next-best thing. Whether you want automated multi-track audio, full-screen capture, or just something built into your computer, one of these three methods is bound to fit your needs:
1 Use Craig Bot (Best for Servers)
On Discord, bots are little add-ons that can do various helpful things like moderating chat, playing music, or in Craig's case, recording audio. You don't need to code anything; just invite the bot, grant some permissions, and let it work for you.
Now, Craig is the go-to bot for voice-channel recording because it grabs each speaker's voice on its own track, and hands you clean, editable audio as separate files. Here's how to record a Discord call using Craig:
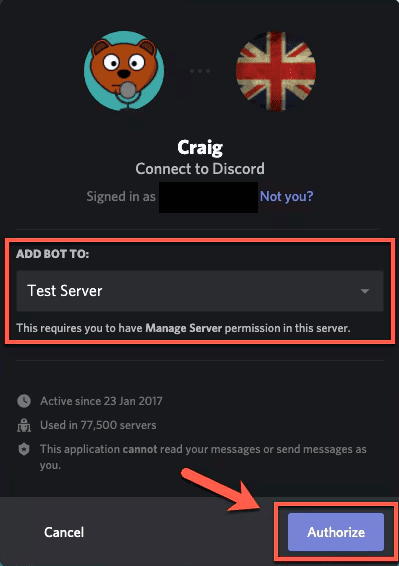
- Step 1. Head over to Craig's website and click "Invite Craig." Make sure the bot has "Manage Server" permissions.
- Step 2. Join a voice channel in your server. Craig only works in server voice channels, not DMs or private calls.
- Step 3. Start recording by typing the /join command. Craig changes its nickname to show it's live and begins recording.
- Step 4. Type /stop to end the session.
- Step 5. After ending the session, you'll get a DM with a download link (MP3/FLAC).

It's super easy to use, which makes it perfect for podcasts, interviews, or any group chat you want to shape up later. You get clean, separate audio tracks for each speaker, everything stays tight and synced (even if someone joins late), and it keeps going for up to six hours.
2 Use OBS Studio (Best for Voice/Video Calls on Desktop)
If you're after full control—voice, video, screen share, and streaming—OBS Studio is a favorite among streamers and content creators for good reason. It's free, works with Windows, Mac, and Linux, and can record multiple audio tracks so you can fine-tune voices later.
Quick-start (2025-safe)
Windows: If you see a black screen, turn Settings → System → Display → Graphics → OBS → Power Saving → High Performance.
macOS: Grant System Settings → Privacy & Security → Screen Recording to OBS.
- Step 1. Download and install the latest version from the OBS Studio website.
- Step 2. Run the Auto-Configuration Wizard to set up the software easily and quickly.
- Step 3. You'll start with a blank screen and an empty Scenes box. Create a new scene by clicking the + button and name it something like "Discord Call."
- Step 4. Now add a new audio source by hitting + under Sources and selecting Audio Output Capture. You can pick your microphone or any other audio source.
- Step 5. If you want to grab the video or screen from Discord, add another source: Display Capture for full screen or Window Capture to record Discord only.
- Step 6. Click "Start Recording" and OBS will start saving your call or video.
- Step 7. End your call by clicking "Stop Recording" and save the file.
OBS is great because it gives you many of the features of premium recording software for free—no watermarks or limits. You can adjust mic levels with filters, mute or boost voices later, overlay webcam or game footage, and output crisp MP4 or MKV files.
That said, it takes a bit of setup time. If you only need one combined audio file, OBS might be overkill. And if you're not used to audio routing, don't stress—telling Discord and OBS which devices to use makes all the difference. Just triple-check your audio settings if nothing shows up in your test recording.
3 Use Screen Recorders (Mac & Windows Built-in)
If you don't want to install extra software, both Windows and Mac offer built‑in options to capture screen and audio, including Discord, in just a few clicks. These are quick and easy, but may not offer the most advanced options.
For Windows, you can use the Xbox Game Bar to record Discord audio or video. "Switch Discord to windowed mode before recording."
- Step 1. Make sure Discord is running and your call or voice channel is active.
- Step 2. Press Win + G to launch the Xbox Game Bar.
- Step 3. Hit the red record button to start recording.
- Step 4. Press the stop record button to end the recording and save the file to your PC.
On a Mac, QuickTime Player does the same thing:
- Step 1. Open QuickTime Player. Go to the Apple Menu > File > New Screen Recording (you can also choose New Screen Recording or New Movie Recording to capture video).
- Step 2. Enable internal mic for voice and hit "Record."
- Step 3. End the recording once completed and save the file.
If you need simple controls or just a quick record, these methods will work. But for clean, separate audio or serious editing, tools like Craig or OBS are a smarter bet.
Part 2: Record Discord Audio Only (No Video)
Now, if you only want to learn how to record Discord audio from a voice chat, there are three methods that let you do that cleanly, without the clutter of video or visuals:
1 Use Audacity (Audio Only, Free)
Audacity is a free and powerful tool that lets you record any audio your computer plays. It's open-source and available for Windows, Mac, and Linux, but you'll need to do a tiny bit of setup first.
To record Discord audio in Audacity, follow these steps:
- Step 1. Download Audacity on your computer and launch the program.
- Step 2. On Windows, set Audio Input to "Stereo Mix," while Mac users need to download an external driver like Soundflower or BlackHole to route system audio.
- Step 3. If you use a Mac, you also need to go to Audacity's Preferences and pick BlackHole as the recording input.
- Step 4. Join your Discord voice channel and hit Record in Audacity.
- Step 5. You'll get a clean audio track of the conversation, which you can save as MP3 or WAV.
Audacity gives you raw audio files without any watermarks. It's versatile and perfect for editing or transcription. However, the catch is that it only captures one audio source at a time. This means you can't have mic and Discord in the same track. For that, you'll need extra tools like VB‑Cable on Windows or create aggregate devices on Mac.
2 Use Virtual Audio Cable (Advanced Setup)
If you're comfortable with a bit of audio routing, you can use a digital audio bridge software such as Virtual Audio Cable (VAC). It lets you pull Discord's sound into Audacity or any recorder, without grabbing your mic at the same time. It's a clean, flexible workflow once it's set up.
This might not be the best method for newbies, but if you have a little bit of technical experience with audio software, you can set it up as follows:
- Step 1. Install VB‑Audio Virtual Cable (free version works fine). It essentially creates an invisible audio wire inside Windows.
- Step 2. Inside Discord, go to User Settings > Voice & Video and set Output Device to "CABLE Input (VB‑Audio Virtual Cable)." Your mic stays as your usual input. This routes only Discord audio into the virtual cable.
- Step 3. In Audacity OBS, set the recording device to VB-Cable.
- Step 4. Hit record in Audacity or OBS, join the Discord call, and you're capturing only their audio.
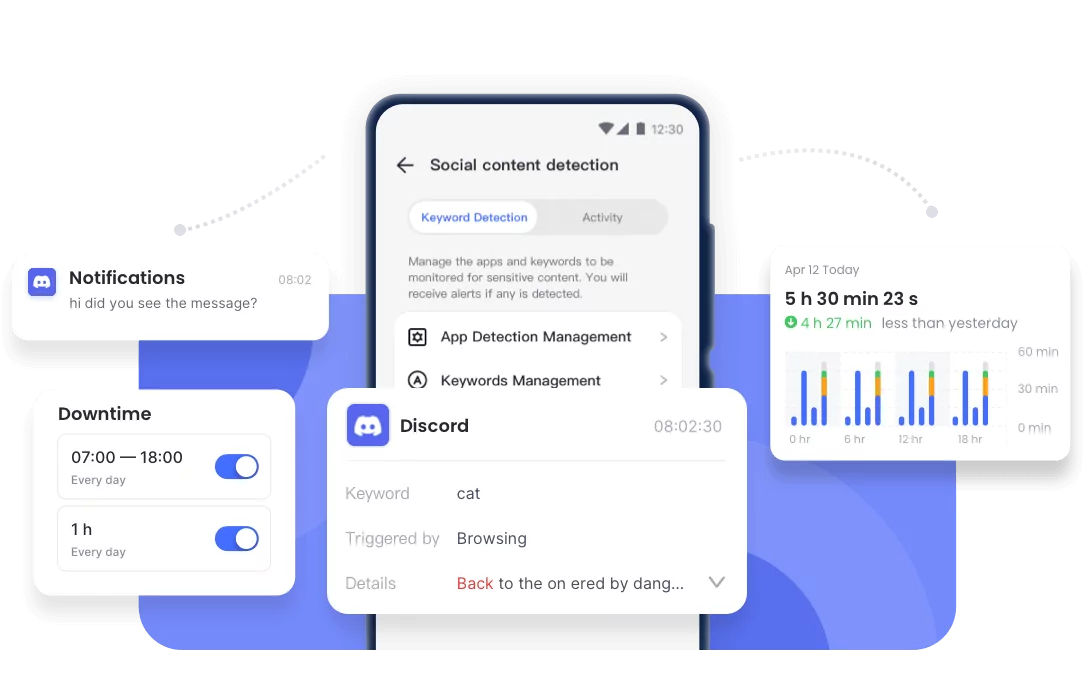
3 Recording Discord Calls Remotely with AirDroid Parental Control
For general use, popular apps may work for recording Discord calls, but if you're concerned about your child's safety during online voice chats, AirDroid Parental Control's One-Way Audio feature provides a more reliable solution. With this feature, you can remotely monitor and record Discord calls with your child's consent to help ensure your their online safety.
⚠️ Note:
- Make sure the target phone is an Android device.
- You can only listen and record if your child uses the speaker during Discord calls.
Here's how you can start:
- Step 1. Download and install AirDroid Parental Control on your device.
- Step 2. Open the app, follow the on-screen instructions to complete the setup, and bind it to your child's phone.
- Step 3. To remotely record a Discord call, simply tap the "One-Way Audio" button on the main AirDroid screen.
- Step 4. After a brief loading period, you'll be able to listen in real-time and record the conversation by tapping the record button.
Tips: AirDroid Parental Control also offers a web version. Visit webparent.airdroid.comto monitor your child's Discord and other online activity.
Conclusion
These were all the reliable solutions that show you how to get voice recording of Discord audio. You can pick one based on your needs, whether you need clean multi-track audio, quick and simple recording, or advanced routing control.
Just remember: always get consent before recording, as Discord's rules and privacy laws require it.
For parents, monitoring activity is different from recording. Tools like AirDroid Parental Control offer a balanced way to keep kids safe without spying on private conversations.


Leave a Reply.