How to Set Up Home Assistant Kiosk Mode on Android [2 Ways]
- Part 1 :What is Home Assistant?
- Part 2 :What is Home Assistant Kiosk Mode?
- Part 3 :How to Set Up Kiosk Mode on Home Assistant (2 Ways for Android Device)
- Part 4 : FAQs About Home Assistant
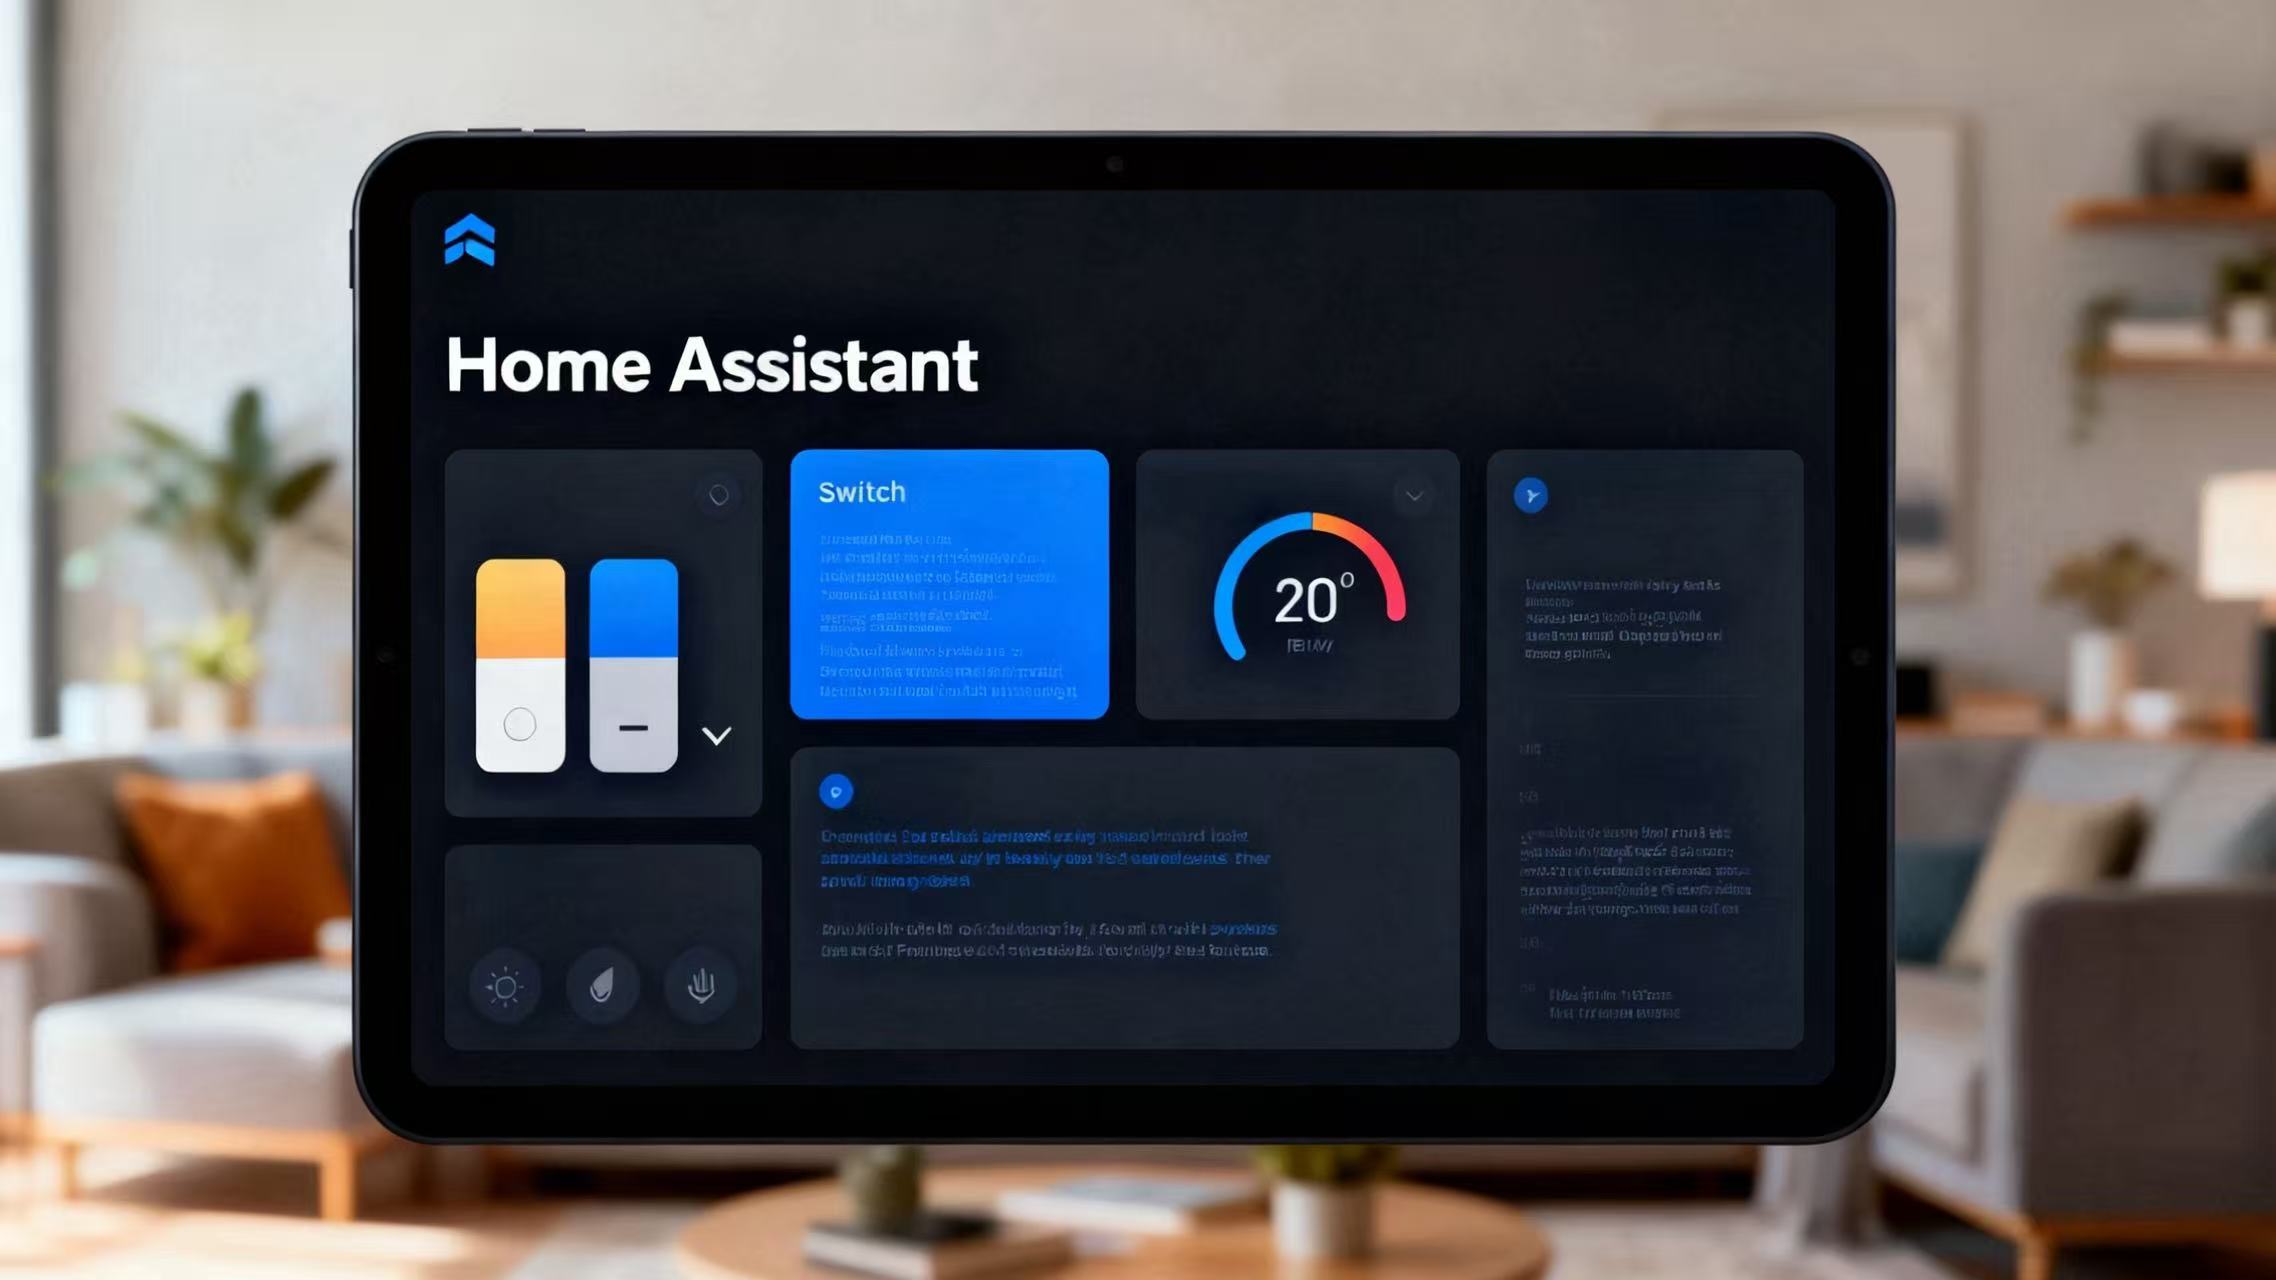
Part 1 : What is Home Assistant?
Home Assistant is an open-source platform for smart home automation that allows you to control all your connected devices from a single interface. Unlike cloud-based systems like SmartThings, Home Assistant is completely local, meaning it doesn't rely on internet connections or external servers, ensuring better security and faster operations. It supports a wide range of devices, including lights, thermostats, security cameras, sensors, and more. Since it’s free and open-source, it has a thriving community that constantly improves its features and integrations.
Part 2 : What is Home Assistant Kiosk Mode?
Home Assistant Kiosk Mode is a setup that transforms your Android tablet (or any device) into a dedicated control panel for managing your smart home. By using Kiosk Mode, you can lock the tablet to only display the Home Assistant dashboard, preventing users from exiting the interface or using other apps. This is especially useful in public spaces or homes where you want a streamlined, touch-friendly interface for controlling smart devices.
Part 3: How to Set Up Kiosk Mode on Home Assistant (2 Ways for Android Device)
For Starters: Install Home Assistant Before Setting Up Kiosk Mode
Before setting up Kiosk Mode, you'll need a Home Assistant server running on a device that stays online 24/7. This can be a Raspberry Pi - , an old PC, or a NAS. Here are the basic steps:
- A device (Raspberry Pi, PC, or NAS) with Home Assistant installed and connected to your local network.
- An Android tablet (version 7.0 or higher) with Wi-Fi access.
Step 1: Install Home Assistant (On Any Device)
* Download the HassOS image and flash it onto your Raspberry Pi, PC, or NAS.
* Connect the device to power and your local network via Ethernet.
* Open a browser and visit http://
Step 2: Install the Home Assistant Companion App (On Android Tablet)
On your Android tablet, go to Google Play Store and search for Home Assistant Companion.
Install the app and open it.
Enter the Home Assistant URL (http://
Way 1: Use Fully Kiosk Browser on Any Android Tablet
Step 1: Install & Launch Fully Kiosk Browser
Go to Google Play Store and search for Fully Kiosk Browser.
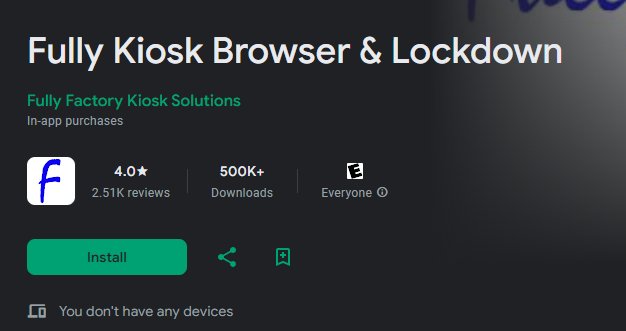
Install the app and open it. In the main screen, select Quick Setup and grant necessary permissions (camera, storage, overlay) for full functionality.
Step 2: Set the Home Assistant URL
In the Start URL input box, paste your Home Assistant's URL (e.g., http://your_ha_ip:8123/lovelace-tablet#view1).
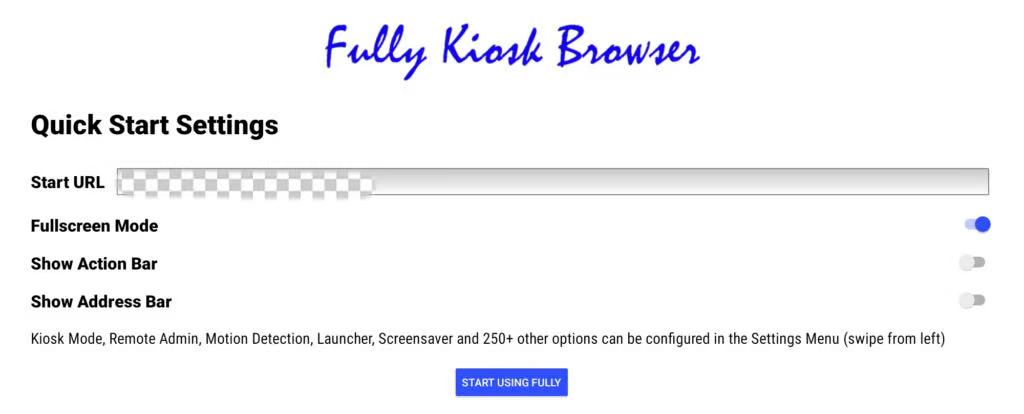
Enable JavaScript (keep it ON for full functionality).
Step 3: Enable Full-Screen Mode & Hide Navigation
In Web Content, enable Fullscreen Mode to remove browser UI.
Under Device Management, turn on Hide Status Bar and Hide Navigation Bar to prevent users from accessing the device's controls.
Step 4: Enable Kiosk Mode
* Go to Kiosk Mode and enable it.
* Set a Kiosk Exit Gesture (e.g., double-tap top-left and bottom-right).
* Set a Kiosk PIN (4-6 digits) for security (this will be needed to exit Kiosk Mode).
Note: The free version shows a watermark and a PIN prompt. To remove this, you can upgrade to the Fully Plus License (approximately $9 USD).
Step 5: Set Auto-Start on Boot
In Device Management, enable Autostart on Boot to make sure the app starts automatically when the tablet is powered on. Also, enable Keep Screen On to prevent the screen from turning off (ensure it's plugged in for constant display).
Once you've set everything up, tap START USING FULLY, and the device will immediately display your Home Assistant panel in Kiosk Mode, preventing users from exiting the app.
Way 2: Lock Tablets to HA in Bulk with AirDroid Business
When you need to lock Android devices to a specific app, Airdroid Business provides a seamless solution. Its Kiosk Mode allows you to restrict devices to either a single app or multiple apps, ensuring the devices are used exactly as intended. Here's how you can set it up quickly:
Step 1: Register for AirDroid Business
Visit biz.airdroid.com to sign up for AirDroid Business. The platform offers a 14-day free trial, so you can explore the full functionality of Kiosk Mode.
After that, AirDroid Business provides several quick enrollment methods including QR Code enrollment, Device Owner enrollment, Zero-touch enrollment, and more.
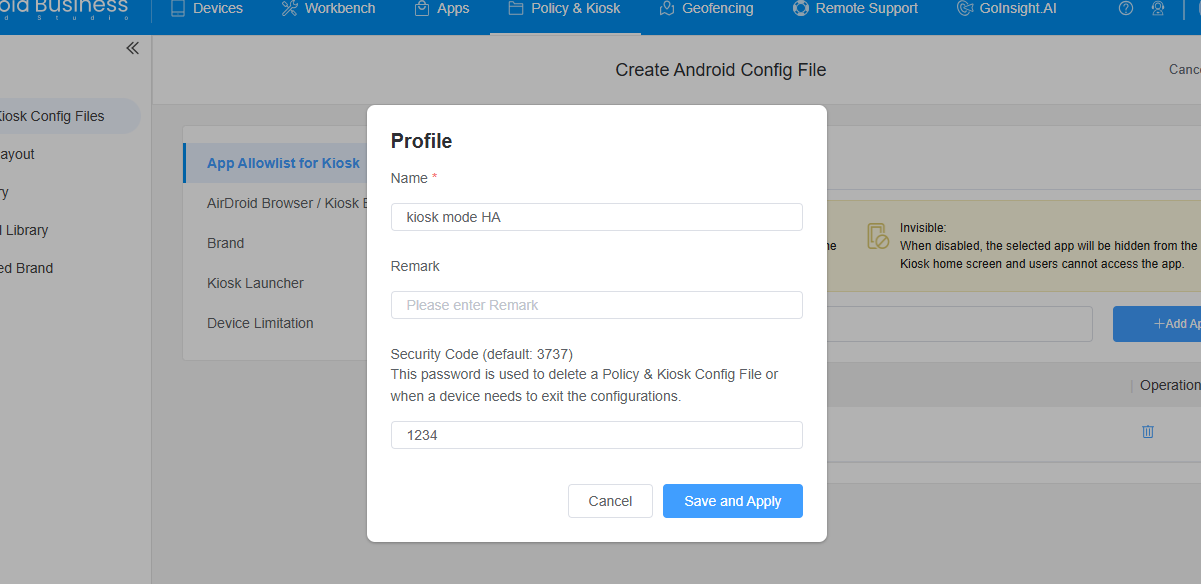
Step 2: Create a Kiosk Configuration
Go to Admin Console > Policy & Kiosk > + Create Config File
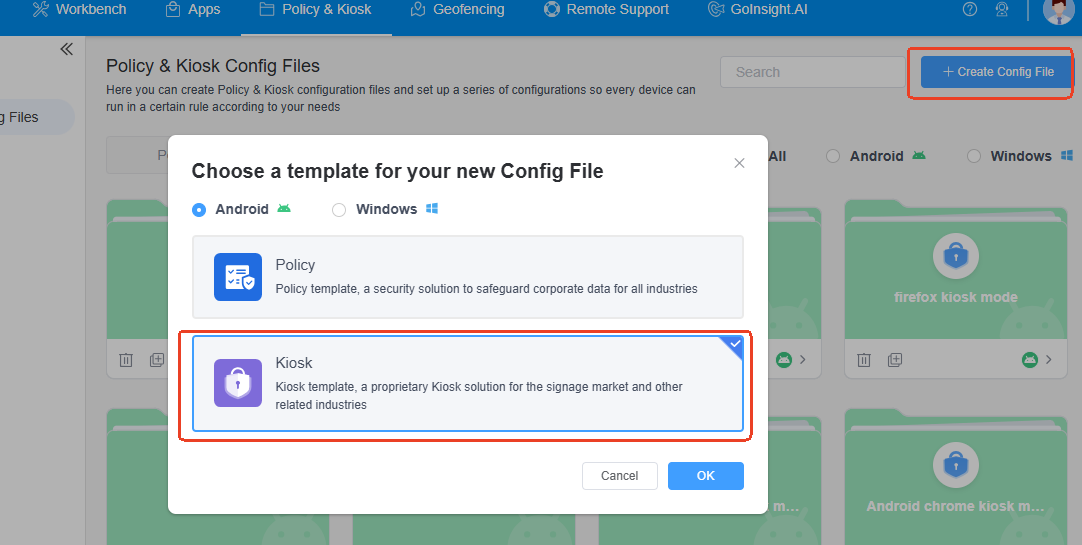
Step 3: Lock Android into specific App
Choose Single App Mode and search for Home Assistant Companion in the app list. Click on Next and name the config file. You can set up a secure exit code (to exit Kiosk Mode) and click Save and Apply.
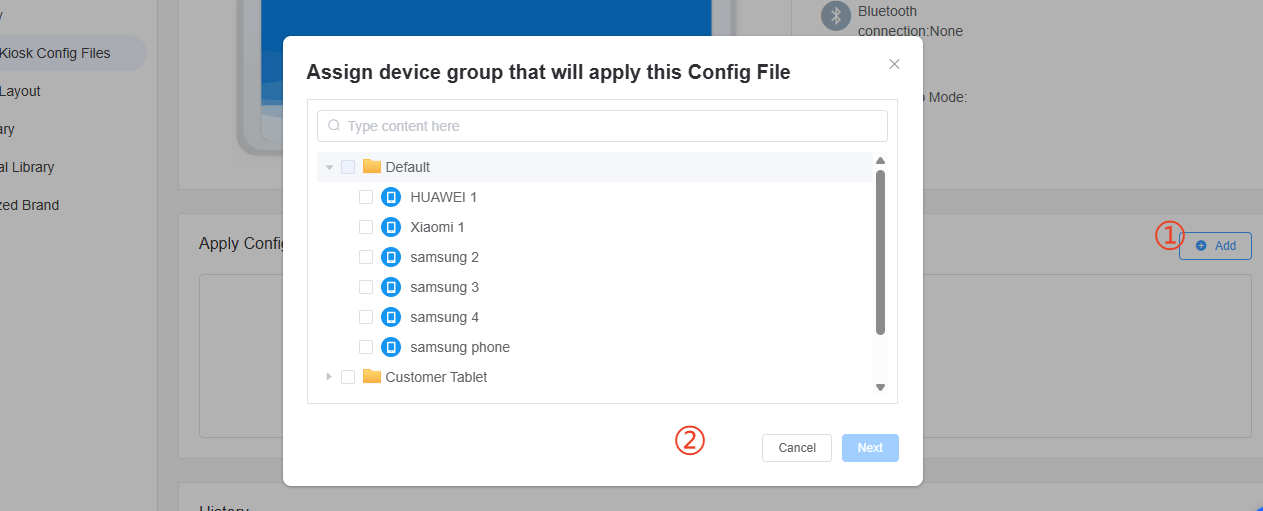
Step 4: Assign the Config File to Target Devices
Click “Add” button to assign the created Kiosk configuration to your target tablets.
Step 5: Kiosk Mode Activated
Once assigned, the Kiosk Mode will automatically be activated on the device, locking it to the Home Assistant app.
A Beginner’s Guide to Kiosk Mode
Learn how to customize device interface and limit user access to apps, websites, and settings to prevent unnecessary misuse.
Part 4: FAQs About Home Assistant
Q1. Is Home Assistant Free?
Yes, Home Assistant is completely free and open-source, giving you full control over your smart home automation. There are no hidden fees, and it doesn't require a subscription.
Q2. What Does Home Assistant Do?
Home Assistant is a powerful platform that allows you to control all your smart devices from a single interface. It integrates with a wide variety of devices and services, enabling you to automate tasks like turning on lights, adjusting thermostats, or even controlling security systems.
Q3. How to Fix “Home Assistant Kiosk Mode Not Working”?
If Kiosk Mode isn't working as expected, check these common issues:
* Ensure the Fully Kiosk Browser app is configured correctly.
* Check if the Home Assistant URL is entered correctly.
* Ensure the tablet is connected to the same network as your Home Assistant server.
* Verify that Kiosk Mode is properly enabled and the device is not restricted by security settings or other apps.
Q4. How to Turn a Raspberry Pi into a Wall-Mounted HA Kiosk?
To set up a Raspberry Pi as a wall-mounted Home Assistant kiosk, you need to install HassOS on the Pi, which is a minimal Linux distribution designed for Home Assistant. Once installed, you can use Fully Kiosk Browser or AirDroid Business to lock it into Kiosk Mode, creating a dedicated smart home control panel.
Q5. What is HassOS/Hass.io?
HassOS is a minimal operating system designed to run Home Assistant, providing the most efficient environment for smart home automation. Unlike traditional Linux systems, HassOS is optimized for Home Assistant and includes automatic updates and system management tools.
Hass.io (now part of HassOS) simplifies the process by providing a Docker-based system to manage Home Assistant along with add-ons.
Q6. How to Secure Home Assistant in Kiosk Mode?
To secure your Home Assistant in Kiosk Mode, you can implement these strategies:
* Firewalls: Set up firewalls to block unwanted external access to your network.
* VLANs: Use Virtual Local Area Networks (VLANs) to isolate smart home devices from other network devices, enhancing security.
* Kiosk Mode Lockdown: Use a Kiosk Mode solution to restrict access to only Home Assistant, preventing any unauthorized usage.


Leave a Reply.